Inside a home, the material covering the ground is maintained regularly and withstands average daily wear and tear in a consistent environment—generally the same temperature all day, every day. But outside, the material covering the ground is maintained less often, yet withstands much harsher climactic conditions—from summer’s humid, sunny weather to winter’s freezing-cold, wet conditions. Because of the constantly changing climate, homeowners try to choose the most durable materials for their outdoor floors; however, no matter how durable they are, there are steps that need to be taken to maintain and update the aesthetics and strength of patios, porches and decks. Here, we’ve compiled a list of projects that home-improvement experts recommend for the DIY and professional upkeep of and updates for your outdoor floors.
Clean it up and treat it right
Pick a nice, warm day this spring to go outside and begin the spruce-up project for your outdoor living areas. First, sweep the surfaces and pick up any debris. Then, do a careful inspection to determine if the winter weather has caused any cracks, loosened boards, etc. After you perform the needed repairs, it’s time for a cleaning. “It is good practice to visually inspect outdoor structures and floors once each year to be assured that the structure remains in safe condition. Cleaning frequency of outdoor floors is directly related to its micro-environment,” says Rick Goldstein, registered architect and co-owner of MOSAIC Group Architects and Remodelers Inc. “In general, if an outdoor floor is in bright sunlight with no trees overhanging, it will require less maintenance than if it is in constant shade with a full canopy of trees overhead. Shade tends to promote the growth of mildew in the moist Southern climate here in Atlanta.”
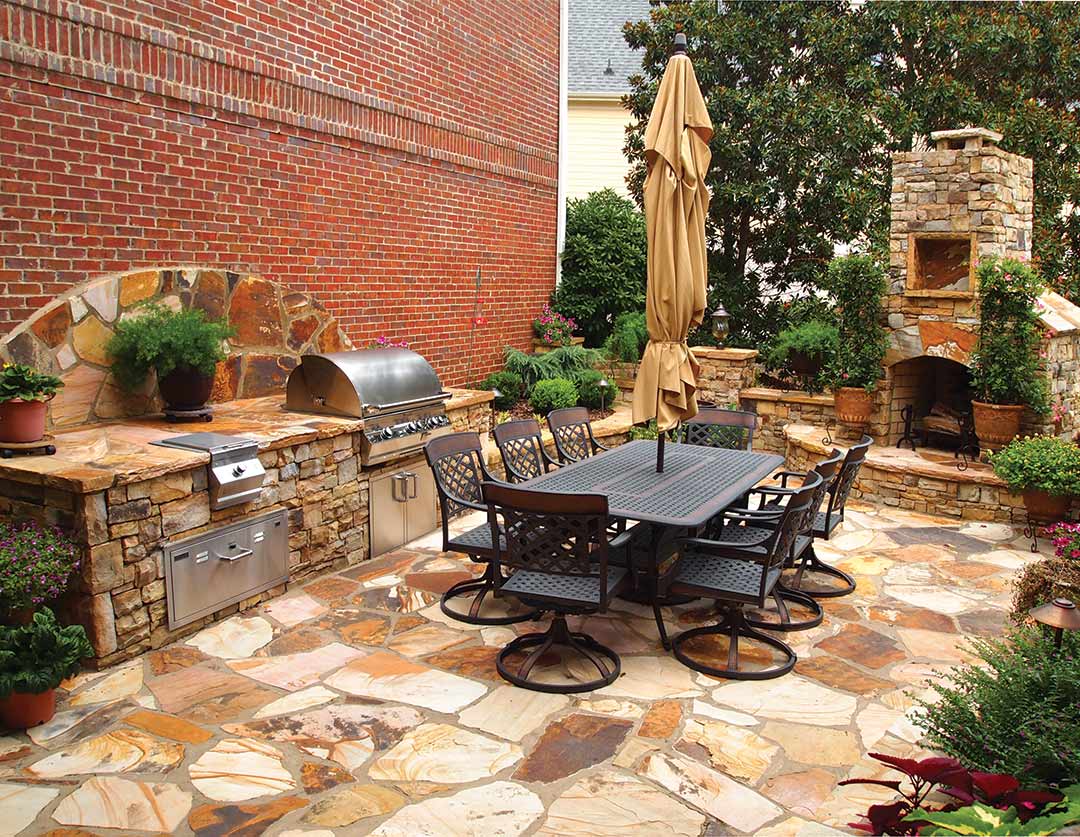
Whether your outdoor floor requires major or minimal cleaning, it is important to note that different types of surfaces require different cleaning solutions, and using the wrong type of solution may result in damage. For stone surfaces, such as pavers or flagstone, a high-powered pressure wash is recommended. “Make sure these areas are free of algae and a good masonry sealer has been used to protect surfaces from water,” says H. Dale Contant, president of Atlanta Design & Build. “If necessary, a light 20-percent muriatic acid and water solution can be used.” Additional maintenance and in-depth cleaning can be performed as needed—for paver surfaces, refer to the “Peak Paving Performance” sidebar for more information.
 MOSAIC Outdoor Living, Renewal Design-Build and RainAway Deck Drain Systems")
Wood decks require a different approach. The experts at Thompson’s WaterSeal recommend first testing the deck to determine if it’s time to re-treat/seal it. This test can be done by simply splashing a bit of water on the surface; if the water beads, then the surface doesn’t need immediate added protection and can simply be rinsed with a garden hose for a quick, easy cleaning. If the water absorbs into the wood and darkens it, however, a special cleaning solution is required. A common wood-cleaning solution is made from sodium percarbonate, also known as oxygenated bleach. Oxygenated bleaches are a great choice for cleaning wood, as they are a highly effective solution that won’t harm any nearby plants—or you (they don’t burn the skin). Be sure to rinse your deck after applying any cleaning chemicals. If chemicals are left to dry on the deck, they can resurface over time and break down the wood’s finish. Be sure to apply a waterproofer after your deck treatment is complete.
“Lightly wash [your wood deck] each year, and depending on wear and exposure to the elements, re-stain it every 2-3 years,” Goldstein says. “Remember that wood needs to dry out sufficiently prior to the application of a stain or sealer. Otherwise, the stain will not penetrate deeply into the already saturated wood fibers.”
For decks made from composite or vinyl material, cleaning is easier. “Homeowners can simply use soap and water,” says Patti Pellock, senior marketing manager with CertainTeed Corporation. “Many homeowners choose to use a pressurized hose to clean the surface in a timely matter.”
However, always take care when using a pressure hose or washer. “DIY deck cleaning using a pressure washer is the No. 1 way most decks are damaged,” Goldstein says. “Wood decking is a soft and relatively delicate material. Using the wrong nozzle or too high of a pressure will damage the wood. It is best to use a wood cleaner with a stiff bristle broom to clean a deck, then hose it off with a garden hose.”
Warren Gaylord, sales manager of Gulf Synthetics LLC, agrees. “Oftentimes, both professionals and non-professionals alike think that the closer the water jet is to the surface, the better. This only causes further damage. You don’t actually do this with your car, do you?”

Safety first
While evaluating your deck, be sure to examine the substructure. “One test I use the first time I go onto a deck is to jump in place gently in different areas, feeling for excessive bounce or movement,” Gaylord says. “This tells me if the deck is structurally sound.”
In Georgia, sun is a major culprit in deck wear and tear. “Because the support joists are in the shade and out of direct contact with the sun’s damaging rays, they have a much longer lifespan than the deck boards on top of the deck,” Contant says.
When inspecting, look for splits, cracks and holes, and test several areas for wood decay. “A tool as simple as a car key can help you determine rot by pressing it against any suspect sections of the lumber. If the key goes slightly or all the way in like an ignition, watch out,” Gaylord says.
Another item on your inspection checklist should be the fasteners—nails, screws or anchor bolts. “Nails will eventually raise up on their own, commonly referred to as ‘popping up,’” says Jeff Butler with RainAway Deck Drain Systems. “A good screw will support the board better and longer without popping up.” He recommends removing nails and replacing them with a quality deck screw, such as the ones made by DeckMate.
Once your deck is cleaned and inspected for safety, there’s only one task you have left to complete—enjoy the great outdoors!
Peak Paving Performance
Outside of a standard pressure wash, pavers can require additional cleaning and maintenance to keep them looking and performing their best.
Seal it up
Applying a sealer to your pavers can do wonders for both their aesthetic appearance and their performance. Sealers are a liquid that is applied over the entire paver surface, then allowed to soak and cure into the joints and surface. It is important to ask your paver source which sealer is best for your surface before performing this maintenance. Often, local hardscape companies can provide this service, taking the guesswork out of a DIY project.
Regularly sealing your pavers can reduce the loss of joint sand, prevent weeds and ants from taking over your outdoor floors and keep the color of your pavers looking fresh and vibrant.
Settlement issues
If your paver base has settled over time, resulting in an uneven surface, it’s best to hire a pro to remove the pavers in the affected area, adjust the settlement as needed, then replace the pavers. The pro can also fix loose or inadequate edge restraints as needed.
Efflorescence
When lime is released from within the paver, it appears on the surface of the paver as a white residue; this is called efflorescence. The lime doesn’t damage the paver, and it usually wears away with time, but it can be removed with cleaners specially made for pavers. These cleaners should be used with care, as many contain detergents and diluted acid that can be harmful to surrounding plants. Contact your paver source for more information on which cleaner to use.
Stains
If your paver has an oil stain, the stain should be treated as soon as possible for the most effective removal—the deeper the stain penetrates, the more difficult it is to remove. First, wipe excess oil from the surface. Next, apply a liquid detergent, allowing it to soak in for several minutes. Then, wash the pavers with hot water. Several treatments may be necessary for stubborn stains.
—Interlocking Concrete Pavement Institute
Project Ideas:
Replank your deck
COST: Varies. Visit your local lumberyard for pricing on composite-deck planks, then use that price to approximate cost based on how many planks will be needed.
INFO: “Replacing your deck boards with composite materials may cost as much as $26 per square foot, depending upon the type of composite used. To replace with pressure-treated pine, the cost could be $15 per square foot,” says Warren Gaylord, sales manager of Gulf Synthetics LLC in Suwanee. Another solution could be to apply a polymer coating such as UDF-21, which could bring the cost down to about $5 per square foot and last for 3-5 years. “At the end of 3-5 years, if you decide it could use another coat, roll out one more maintenance coat and the product will take you to 10 years from the date of the initial application,” Gaylord says.
Install a vinyl post wrap on an old wooden post
COST: $45–$75 per post
INFO: For approximately 15 minutes per post, Pellock says this simple DIY project can deliver low-maintenance benefits without having to replace existing wooden porch posts. “Vinyl post wraps, such as CertainTeed Certa-Snap, also offer easy installation—the components just snap together,” she adds.
Add decorative balusters to your existing deck
COST: Varies by material; approximately $50–$100 per yard
INFO: “Replacing existing balusters with decorative balusters is a simple project that homeowners can do themselves, though many deck builders and contractors will also provide this service,” says Dick Gauthier, vice president of consumer products for Universal Forest Products. Gauthier recommends Deckorators’ lightweight aluminum balusters, or their glass balusters.
Install a new brick, flagstone or porphyry-granite patio
COST: Varies by product; approximately $3.50–$20 per square foot
INFO: While installing a new patio can be a DIY project, for best results, it is recommended that a professional handle this job. According to Chaffee, choosing between brick, flagstone or porphyry-granite pavers is a matter of pattern and aesthetic. “Brick achieves herringbone or other patterns in a simple running bond,” he says. “Flagstones are irregularly shaped and offer a more random pattern. And porphyry-granite pavers offer a rich, old-world look in arching or running-bond patterns.”
Concrete can also offer the look of stone without the difficulty and price.
Install new lighting specifically made for patios, porches and decks
COST: Varies by product; approximately $20–$50 per light
INFO:“Outdoor lighting has really evolved during the past few years,” Brennan says. “Manufacturers are now providing innovative lighting products that can be incorporated into landscaping and decking. These lights offer a warm, ambient glow, adding to a deck’s atmosphere and replacing the old, glaring flood lights of decades past.”
Jay Savignac, vice president of Aurora Deck Lighting, agrees, citing such new products as post-cap lights, available in low-voltage, line-voltage and solar options (available through a number of manufacturers, including Aurora Deck Lighting, Main Ornamental and TimberTech DeckLites), and Aurora Deck Lighting’s newest product, the Phoenix Recessed LED Deck Lights. “There’s no argument that lighting adds function and ambiance to an outdoor-living space,” he says, adding that homeowners can install a set of 10 recessed lights in as little as 2 hours. Gauthier echoes Savignac’s recommendations, and says the installation of solar post-cap lights can take just minutes, as lights are available to fit most posts.